When I first started teaching, teaching clay was in my curriculum and I FREAKED.THE.FUNK.OUT. I didn't take a single clay class in college and only made a couple of pieces in high school. I managed to melt down a kiln, explode hundreds of pieces and even drop my share of masterpieces. Despite all of that, after teaching art, clay and kiddos for over 20 years now (and having written a book on the topic!), I feel like I can finally share my (semi-limited) wealth of knowledge on all things clay!
While my book was written for children who don't have access to a kiln, many of the projects can be used with kiln fire clay!
Over the last three weeks, I have shared everything I know about kiln fire clay on my podcast! It's so much...that I had to break the series into three episodes just to squeeze it all in. So, if you'd like to take a listen here, here you go:
But wait, there's more...
AND just a pinch more...
In case you need a visual, as I often do, here's a video of some of the clay tips I mentioned. For the complete blog post, you can visit here.
More details on my favorite tools and how I set up for clay in the video and my podcast!
Part 3 of this series is all about glaze and glaze alternatives. If you'd like a video with more, check this one out:
If you are anything like me (and bless, as we say in the South, if you are), then you prolly got that art ed degree of yours without being a total pro in all forms of media. I didn't take a single printmaking or ceramics class in college and I got a C in textiles (which is a fave but at the time, I was huffing too many paint fumes, er, REALLY into my painting class, to be bothered with warping that freakin' floor loom). What I did get is a two year degree in oil painting because...you know, that's something we teach to the 10 and under set. Ahem. All that to say, we are expected to be at least somewhat knowledgable about the media we share with our students. But, let's be honest, a lot of times, we are learning right along with the kids.
Now, I've been at this art teacherin' game for sometime now (18 years but who's countin'?) and I have learned a thing or two along the way. One thing is for certain: kids LOVE clay. However, it can be frustrating to teach if you lack experience. Since I've been around the art teacherin' block a time or two (wink-wink, nudgenudge), I thought I'd share some of my fave art teacherin' clay hacks with you. Here you go:
Let's talk about some of the things I've shared and just where you can find them. * Clay mats. I mentioned The Clay Lady and her clay mats. I seriously have had mine FOR YEARS. They are worth the cost of $2 each. * Toothbrushes and doggie bowls. Seriously, what would we art teachers do without places like The Dollar Tree?! Toothbrushes are perfect for teaching scoring and doggie bowls are awesome for holding slip while preventing spills. * Texture! A visit to your thrift store will provide you with a good stockpile of texture for your clay adventures. Placemats, cable knit sweaters, burlap, stamps, you name it. If it has a texture, your clay will capture it. * Skewer sticks. Perfect for cutting, drawing and carving into clay.
Something I failed to mention: what to do with those projects that kids work on for more than one class? To store these effectively, I have a stockpile of old and large zip lock baggies. The kids write their names on the bags in Sharpie, wrap their project in a damp paper towel and place gently inside the back. I tell the kids not to zip their bags shut as that usually traps air inside. Instead, I tell them to push the air out and tuck the opening of the bag under their project. This will keep their clay workable for about a week.
If you would like to continue this clay chat, you are in luck. All throughout the month of May, I'll be hosting clay chats (and craft nights, so come armed with clay!) right here, every Wednesday at 8pm CST. You can work with any ole clay you like...however, I'll be using the clays made available in this kit which you can purchase here. For more info on what we'll be up to, check here.
And now, I thought I'd share with you some of my fave clay projects over the years (many with video links!) for you to take back to your own Art Teacherin' Town. LOOOOOVE to hear your fave clay projects and words of wisdom. Please feel free to leave in el commentos below.
This clay project was one that I did with my second graders FOR YEARS. They love it, it's a great way to introduce texture, slab, coil and glaze. It's also a quickie and with my short art classes, it worked very well.
This was a fun project my third graders did one year. If you've taught clay before, then you've probably done the coils-in-a-styrofoam-bowl project (I know I have!) a different spin on that is having the kids use slabs of clay to create flowers. We had a spring theme one art show and these fit in beautifully.
I almost always do a clay project that emphasizes texture with my kindergarteners. I'll share all of those projects...but this one is always a fave: texture butterflies!
These clay fish by my first graders always crack me up! They had so much fun creating the silly expressions on these a couple years ago. If every glaze is not an option, here is a fun alternative: florescent oil pastels and watered down black paint!
Inspired by the painted elephants in India, my fourth graders created these fun guys one year.
Funky frogs were created by my fourth graders one year. They had so much personality! This was a project we worked on over the course of a couple of art classes...which really allowed the kids to get creative.
One year, to go along with our Asian theme, my fourth graders created these fun pandas. Each had their own wild and wacky personaltiy.
To go along with that theme of Asia, my third grade kiddos created these Chinese dragons which they had a great time doing.
So I might have a thing for animals and clay...what do you think? My kindergarten and first graders created these pinch pot pets a couple of years back when our art show theme was to raise money for a local animal shelter. And, what do you know, animals are our theme again this year!
That year, my second graders created this version of pinch pot pets: two pinch pots put together to create the body of their animal.
And my fourth graders created these! Definitely a favorite by both me and the kiddos.
Yet another spin on pinch pots and animals: using the pinch pot as a container. Our school mascot is the tiger and this particular year, second graders created tiger pinch pot containers.
Now last year, I decided to go for a food theme and create the art room into a 1950's style diner. These projects were not shared in detail like my others because...I was in the middle of writing my clay book and these projects are all featured in that book! The book is written to be used with no kiln fire clay...but, as you can see, you can use kiln fire clay as well. You can scoop up your book here.
My first graders served up these coffee and donut delights.
Second grade backed up cupcakes. Y'all better believe the retro lover in my totally enjoyed decorating for this art show!
Third graders made hamburgers and fries...complete with all the fixin's.
While others made pancake containers with hand painted paper plates.
A kid and crowd favorite were the pie containers. The kids had so much fun googling pies and sculpting their favorite.
While other classes did pizza containers. I reached out to a local pizza place for the boxes to display the pizza in.
This year, we are back at it with an animal theme! We are transforming the art room into a pet shop. Third grade is in charge of the reptiles.
But a crowd favorite so far are these fun and funky birds by second grade. They crack me up!
Many more clay projects are coming up so stay tuned. However, if you just can't wait, you can see a handful of clay projects that have not been shared here but are on my YouTube channel. I always upload there first...so if you'd like to stay up to date, you might consider hitting subscribe.
I'm so excited to share with you just how amazingly awesome these exotic birds by my second graders turned out! If you subscribe to my YouTube channel, then you might already be familiar with this video lesson I created (and may have used it with your students!). I was uncertain how I wanted the kids to finish them off (to glaze or not to glaze). In the end, we went with this super fun florescent paint and metallic watercolor for the base. Here's the how-to video!
For our school-wide art show, our clay sculptures will be based on a pet shop theme with each grade level making animals, reptiles and fish for the occasion. Our theme last year was a 1950's diner where the kids all made food...after doing that fun theme, I wasn't sure if we were going to be able to top it. But these birds have certainly changed my mind about that! In the video, I use skewers as the legs but in the end, I was worried that they would not be strong enough to support the bird. So as the kids finished their birds and bases, I had them bring them to me. I used the skewer to write their name and class code on the bottom of each. Then I pushed popsicle sticks into the bottom of the bird and the base just to make sure they would work together. After the kids left, I removed the sticks, wiggling them back and forth. I did this because I know that clay shrinks as it dries. I then allowed the clay projects to dry for a week or more.
Last week, the kids got their birds and bases back and were given bright colors of paint and plenty of visuals to work from. I gently suggested that they might want to make them look like parrots or toucans...but I also wanted them to explore the idea of creating their own idea of an exotic bird. Once the paint was dry, I hot glued the sticks to both the birds and the bases (I had used the stick to add the holes into both before firing). Sparkle ModPodge was added to the finished birds because...SPARKLE MODPODGE. Need I say more?
Today, the kids were given sparkle pipe cleaners, feathers (both of which were found at the Dollar Tree) and beads from my unending supply of beads (seriously...do they multiply?!). I gave them a couple of tips on how to twist the 'cleaner and add the feathers...and then just let them go to town.
They had a blast and are just so super proud of their birds!
I suggested folding the pipe cleaners in half, adding beads if desired and bending the 'cleaners into spirals. Of course, their fave part was digging through the treasures on their tables...
Once complete, they brought their birds to me where I hot glued their feathers and pipe cleaners into place. I found this great resource and asked the kids to do a little bit of research on their birds before our short 30 minutes was up. I borrowed some books from the library to help them with that task. Tomorrow, they'll continue writing, add an illustration and learn even more about exotic birds.
Now that we are closing in on the art show and the end of the school year, I don't plan on doing too many more projects with these guys. We do have this project to finish up next week...but after that, we'll be working on decorating the art room for the art show!
I love all of the creativity that went into these birds! They were colorfully beautiful before...and now they are just fantastic.
Teaching clay is one of my all time favorite things because the kids absolutely LOVE it! Ask them what their favorite medium is and it is always clay. I haven't been able to share some of my fave clay projects with you as they are in THE BOOK and, therefore, owned by the publisher. I was so excited last week to get my copy of it!
Almost all of the projects in the book (with the exceptions of the edible clay {yes, there is an edible clay project!}) can also be created with kiln-fired clay. So it's perfect for those with or without a kiln...really anyone who wants to explore clay with kids! And, in case you are a little intimidated by clay...OR just want a reason to play with the stuff yourself, you might want to join in on my FREE clay workshop! I'll be hosting it on my Facebook page every Wednesday night LIVE for about an hour. I'll be working with Celluclay, air dry clay and plaster wrap. You can use whatever supplies you have on hand OR you can purchase a kit of the supplies to explore and create along with me (and many others!):
I cannot wait. Craft nights on Facebook LIVE have been so much fun!
And, stay tuned...I'm unloading that kiln daily and the clay projects coming out of it have just been so fun to see. I find myself scrambling to get to school just to peak inside.
Here is an accurate portrayal of my face when doing so, ha! Y'all have a great week!
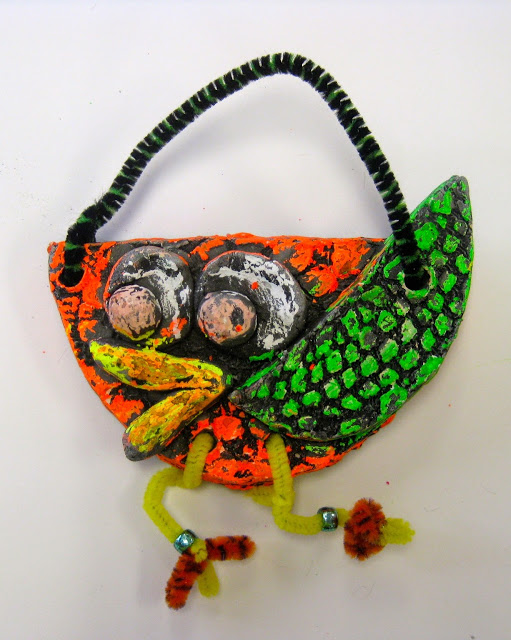
Y'all. When I opened the kiln this morning (which I had no right doing as that big ole lug was still flashing 600 degrees), I let out a squeal. Who snuck into the art room and put a bunch of cute-ified chameleons in my kiln?! I mean, really. Can you even handle...THIS?
I know I can't. I'm so excited to share these with the kids next week. Their hard work sculpting and glazing paid off. Here's the video that I created to teach my sweet third graders this fun lesson:
The kids have loved this lesson! Having taught art (and clay!) for nearly 20 years, I've learned a thing or two along the way. My biggest tip for those working with kiln-fire clay: LET THE FINISHED PIECES DRY FOR LONGER THAN YOU'D EVER IMAGINE.
I was always led to believe that the reason clay exploded in the kiln (and I've had my share of 'splosions) was because of air bubbles. I call baloney on that theory. The reason there are explosions is: the clay is still WET. I allow my clay projects to dry in the kiln room which is both hot (due to the kiln) and well ventilated (as they should be) for TWO WEEKS. That's right, you heard me. Here's the deal: if there are any water molecules in the clay, as they are heated up in the kiln, they begin to move, faster and faster, until they cause an explosion. However, if you wait...every last one of those water molecules will evaporate and diminish your chance of breakage. One way to test and see if greenware (unfired clay) is ready to be fired? Touch it. If it feels damp, even slightly, it is still holding water and needs to dry. The problem is...if your students' clay projects are thick (and some of these chameleons were very thick!) there might be water trapped within the clay project that you cannot feel with touch. My suggestion? Fire on the slowest setting possible. This will help air out the clay before ramping up to firing mode. In other words: When in doubt, DRY IT OUT. Can someone please help me off this firing soap box?! It's hot up here!
Now, when it comes to glazing, that's a whole 'nother story. Glazed pieces can be fired on the fastest setting as they have already been fired once and are not going to explode. In case you are curious, I use Cone 06 clay and glaze.
I don't always glaze with my students. After all, two firings is super time consuming. However, I do think that the glazing experience is important for kids to be exposed to at least once. It's truly magical. Imagine: little pieces of glass that are going to transform your dull clay project into a shining, sparkling masterpiece!
My favorite glazes are Mayco's Stroke and Coat. I love their color variety. I did order some of their Jungle Gems to add a bit of spots and sparkle to their projects...and I was a touch disappointed. I don't think I shook the bottles up enough because I don't see too much of the spotted and speckled effect. Perhaps my next crop of chameleons will be more speckled as their glaze is near the bottom of the bottle where all the glass has settled.
This lesson is NOT featured in my book...which is why I can share it and the video for free with you here. Many of the project directions from last year's art show were not shared here...because I was under contract with the book publisher. Little known fact: when you are writing a book, they "own" the rights to your ideas! All that to say...all of the lessons I share in the book have not been released here. So 52 NEW art projects for you and your kiddos...that can be used with both no-kiln and kiln-fired clays!
ALSO...in case you didn't know, I've been hosting weekly #creatingwithcassie craft nights right here. Currently, we are felting but next month, we are exploring clay!
If you'd like to join the fun and explore some fun new materials, pick up your clay kit here...no kiln required!
Now...this is just the beginning of clay themed posts as I've declared the month of May, the month of CLAY! So brace yourself...lots of clay posts ahead!