Showing posts with label first grade. Show all posts

Sunday, February 26, 2017

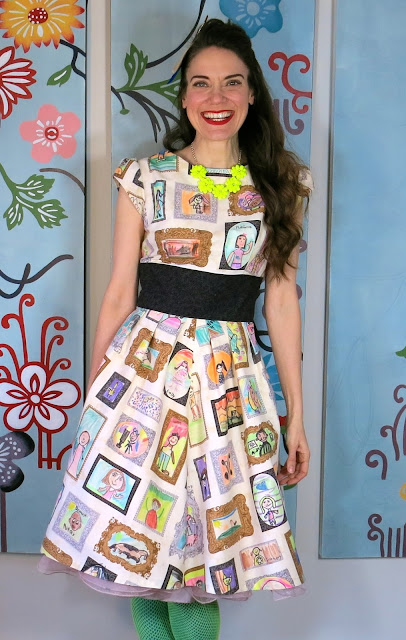
DIY: Kid-Created Self-Portrait Dress

Last spring, I found this amazing frame-covered fabric and my head just about exploded from excitement. I wish that were an exaggeration but it's really the little things, like AMAZING fabric that get this girl all head-explode-y. I had really wanted my kids to create selfies on it then and debute their work at last year's art show...but between frantically finishing projects and slapping them on the wall, we just ran out of time. Not to mention, we ended up going with a 1950's diner theme and the kids ended up splatter painting my ensemble instead. So there's that...er splat. 
So this year, I decided to just bust the fabric out for my earlier finishers and leave it as an option for them to create on. It seems I have more early finishers with my kindergarten through second grade. Those are the grade levels that contributed the most. I didn't give much direction other than to draw their portrait with a black marker, color it in and do their best. 
In fact, earlier this week when I said, "Remember, please do your best!" 

First grader: Yes, Boogey.
Me: Who in the world is Boogey?
First grader: That's my mama's love name for me.
I laughed and that's when the rest of the class chimed in: Ms. Boogey!
Me: Let's just stick with Mrs. Stephens, okay?
First grader: Okay (whispering)...Boogey. 

There are so many happy memories tied to this dress! 
 On Friday, I had a kindergartener look me up and down and say, "Why do you dress different everyday?!"
Me, knowing full well what he meant but still...: Don't you dress different everyday?
Kindergarten: Not THAT different. 

Touche, kindie, touche. 
When the kids grew tired of drawing themselves, they started to draw me...or me with them. I'm so loving my big hair day on the bottom left. 
When the kids finally finished the fabric this weekend, I was determined to get it stitched up. I really wanna wear it next week at NAEA in NYC. When I told my second graders that I was going to make the fabric they were drawing on into a dress, they were completely stumped...even though we've done this before.

Second grader: Wait. This {pointing to the floor} is gonna be a dress? 
Me: Yes! And a bunch of other art teachers are going to see it.
Second grader: Wait. {is this a new thing? Why am I always "wait"ing?!} Are we gonna be famous then?
Me: Oh yeah. Totally!
And the crowd went wild. 
Many of my kids had colored the IKEA Coloring Book fabric that I stitched into a dress and they know the drill. They love that dress and have so much fun pointing out the spots they colored. It's my favorite dress to wear when I travel to art teacherin' gigs as the folks at airport security seems to know me based on that dress. It doesn't stop them from going through my luggage of oddities tho. 
Final touch: a French hook to close the top of the dress. We'll see if I ever get around to that. Why do the smallest of tasks seem like mountian-moving to me?!
 I love that I didn't give the kids any direction as it really allowed their artistic personalities to shine. I have highly detailed drawings all the way to scribble-ville and I wouldn't have it any other way.
I was so surprised that I knocked this dress out so fast...tho I should't be. This is only the MILLIONTH dress I've created in this style. I cut the fabric Friday night, got the bulk of the work done on Saturday and today I just added the second sleeve (ugh. don't get me started on slllleeeeeeves), put in the zip and stitched the hem.
I think the kids are gonna love this dress!
I know I smile at the little faces on it! 

 photo signature_zpsd10b3273.png
Read more »

Thursday, February 23, 2017

In the Art Room: Folk Art Still Life Inspired by Kerri Ambrosino

 Next week, I'll be heading to the Big Apple for the NAEA convention (you can check out the dates/times/topics I'll be presenting and co-presenting here). In preparation, I've been working on my sub plans which, as you know, is always a really good time. Because I'll be presenting on folk art, I decided to base my sub plans around that theme. In particular, my students will be learning about the Mexican folk artist Kerri Ambrosino
I'm a sucker for color and pattern. I am using her work to also reteach the elements of art and introduce the principals of art. While I am gone, my students will tackle the first half of the sub plan video and we'll do the rest together when I return. Cuz there ain't no way those kids are using puffy paint without me! I'll be doing this lesson with all grades. When I create sub plan videos, I often do this because it is so much easier for the sub. They become experts at the lesson and don't feel flustered going from one lesson to the next, switching out visuals and supplies. A Happy Sub means Fewer Flubs! Here's the sub video. Feel free to use in your art teacherin' adventures:
Supplies needed:

* Popsicle sticks. I have ONE TRIZILLION popsicle sticks. I always get them donated and I never know what to do with them...until now. Of course, they aren't necessary for this project but they do add a fun three-dimensional element. 

* Matte board/cardboard. This will hold the weight of the sticks. I have a surplus of card and matte board as well so this was a good way to use that up. I cut it 4" X 7".

* Construction paper.  In various colors, also cut to 4" X 7" to serve as the background.

* Scrap papers. For the vase and flowers.

* Foam flowers. Again, another art room surplus. Let's use 'em up! They'll also add that fun third dimention.

* Puffy Paint!
 While I'm away, I hope that the students will get all of their sticks decorated and glued to their background. For my 30 minute classes, they might only get the sticks complete. For my hour long classes, they should have no problem knocking that out. We are also creating large scale flower still lives for teacher appreciation...so my early finishers start on that with their decorated strip for the table. 
 Kerri's work is just wonderful! I love everything about it and I think my students will as well. I'm excited about these small masterpieces. They'll make a great addition to our art show and the perfect presents for Mother's Day...which I know is far off but I always procrastinate. Not this time!
 I will be certain to share a follow-up blog post.
If you give this lesson a go, I'd love to know! Special thanks to my P.E. buddy Ali for working out the kinks of this project with me. 
 photo signature_zpsd10b3273.png
Read more »

Tuesday, February 21, 2017

In the Art Room: Introducing the Principles of Art

My first grade students are currently learning about the folk artist Kerri Ambrosino. Here's a sneak peak at their works in progress. As they moved on to the next phase of this project today, I thought it would be a great time to introduce the Principles of Art. We already know the Elements. Here's a video of the simple hand jive I taught the students as well as a sneak peak inside this first grade lesson:
As I've mentioned, I do a lot of call and response, almost too much. But it really helps my ELL students, reinforces vocabulary and, frankly, it's just plain fun. I love hearing my students voices in that video, you can hear each of their fun little personalities. 
Here's a little more on the Elements of Art hand jive. 
My first graders used a similar method to painting and preparing their papers for this collage. You can see more of that process here
Love to hear what fun songs and dances y'all use to reinforce vocabulary in your art room! 
 photo signature_zpsd10b3273.png
Read more »

Tuesday, February 14, 2017

In the Art Room: Experiments in Color Mixing

If you need a quick color theory activity, have I got the thing for you! My first grade is in the middle of a folk art-inspired landscape project (details to come) and they are currently learning about pattern, creating tints, the parts of a landscape, y'all know the drill. Today I wanted them to create some beautiful papers for the details of their landscape. But how? Painting with marbles, that's how!
Using the same trays that second grade used for floating chalk prints and shaving cream marbling, I just dropped two primary colors and white at one end of the tray before the kids arrived. They were to pick any color of paper they liked, write their name and teacher code on the back and place the paper with the name down into their tray. Each tray got a large marble and they just started rolling. 
 I have a ton of these trays so each student was able to have their own. After they thought their paper was covered to their liking, they could get another paper, swap trays with a buddy who might have different primary colors and start rolling. 
This was a huge hit, y'all. The boys were super into it. I heard them excitedly talking about what colors they were creating and the different types of lines their marble made. I was asked if we could do it every art class. 
 Not gonna lie, rinsing out all of those trays was the most taxing part. Other than that, it was the perfect on-the-fly activity with a super powerful impact. 
I can't wait to share with you what they create with these beauties. And I now know what my kindergarten friends will be doing this week as well.
Have fun, y'all! 
 photo signature_zpsd10b3273.png
Read more »

Saturday, January 21, 2017

In the Art Room: Happy Hearts Inspired by Chris Uphues

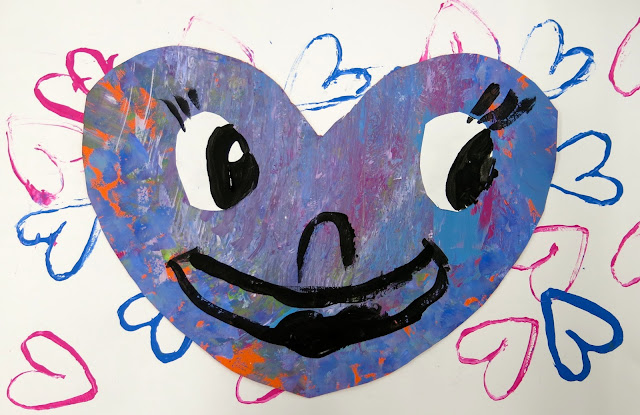
Hey, friends! Second grade-land has just finished off a fun project with a strong focus on LOVE. My theme this year has been kindness and with Valentine's Day right around the corner, I really wanted to focus on all things love-y. Because, let's face it, the world could use a whole lot more love right now! 
And if these happy hearts don't help spread the love, I don't know what will! 

Another focus this year has been to introduce my students to more contemporary artists and also street artists. During my search, I discovered the artist Chris Uphues and completely fell in love (sorry, I had to) with his work, especially his happy hearts! 
If you aren't familiar, Chris is an artist based out of Chicago whose heart murals can be found there as well as in New York and Los Angeles. When I discovered his work, I was immediately struck by how happy it made me! I knew the colors, energy and joy in his work would really resonate with my students. Y'all should really check out his website...I love that his hearts can be purchased in the form of reasonably priced prints, patches and pins. I've got a cart full! 
I would totally cover a wall in my house in these! I mean, who wouldn't?! 
For the Happy Hearts pieces that my second graders created, we used the following:

Day 1:
* Black and white paper, 12" X 18"
* Tag board heart stampers
* Paint in yellow, magenta and turquoise

Day 2-3: 
* Painted papers, construction paper, scrap papers for hearts
* White paper for eyes
* Black paint
* Scissors and glue
Day 1:

I see my second grade kiddos for 30 minutes, twice a week. On our first day together, we chatted about Chris and his work. I introduced the kids to printing and we printed a black paper and a white paper full of hearts. To see how the heart stampers were created, watch the first 5 minutes of this video
On day 2, students learned how to cut out hearts. Many students knew how to do this already...but I had several that didn't. This was a great introduction to symmetry! I also offered them oval, circle and other shaped templates for the eyes. Once those were glued down, black paint was available for the artists to paint the faces. I had printed off several sheets of Chris' hearts to give the kids ideas for expressions. 
By the end of the second day, we had a ton of these! I love how happy and fun they are. 
Over the next couple art classes, the kids created more hearts and began adding them to the printed backgrounds. They so enjoyed creating these expressive heart faced characters. This project was a huge hit with them! 
Each kid was super engaged in creating their heart collages. When I told them that we'd be moving on to another project next week, each class shouted "WHY?!" They couldn't stop making these hearts! I just might have to give them one more day to keep on heartin'. 
As they worked, the kids had stories about each heart and how they interacted with each other. We had heart moms, dads, babies, grandparents, you name it! 
As they worked, the kids laughed at their hearts, showed them off to friends and pulled ideas from one another. 
Before gluing, we did chat about composition, overlapping, emphasis and scale. I wanted to remind the kids of these thoughts as they worked...but made sure not to weigh in too much as I really wanted to see where their ideas would take them. 
 Because, I mean...look at how fun and funny they are!
I'm so looking forward to showcasing these throughout our school along with all of our other LOVE-based projects. Just a quick scroll through this blog and you'll find half a dozen love-based projects we are currently working on in the art room. 
The best part is, I've tagged Chris Uphues on several posts showcasing the kids' hearts on my Instagram and he's been so sweet to respond! The kids have loved hearing his positive feedback. 
It's made us feel all...happy! Like this. 
 
If you are looking for a fun lesson for your students that introduces printing, symmetry, expression, collage and the amazing contemporary artist Chris Uphues, I strongly recommend this fun lesson! Love to hear from you if you give it a go!
 photo signature_zpsd10b3273.png
Read more »