In this blog post, I'll be sharing a lot of images from my art room over the years. This image is from a post about my New Years Art Teacherin' Resolutions from 2016. Check it out if you'd like to see how I created my art room placemats!
Over the summer, I dropped by my art room to grab some things and I saw my art room with fresh eyes. The above was my view. And all I could think was: LOOK AT ALL OF THIS VISUAL CLUTTER! One of the posters was falling down (as all things do on those cinder block walls) and it inspired me. Before I could stop myself, I was tearing it ALL down until the wall was blank. Hearing the commotion, my custodian buddy, Mr. Joe, walks in and asks me what I'm doing. Decluttering! Like you always tell me to do!
"Yeah, but now what are you going to put there?"
I had no idea. But I did know that it was definitely going to be more visually pleasing and less visually noisy than what had been there before.
And here is what that space looks like now, after much work. I moved my demo/document camera table so that it is now perpendicular to the wall. This allows me to create and not have my back to the kids while doing so (never a good idea, amirite?!). I created the giant color wheel with wooden oars; repurposed the thrift store cart with pencils and it now holds the artwork of the classes I see on that particular day; I came up with a new set of rules and had a blast painting them (downloadable PDF here) and hung some fun folk art along with my paintings.
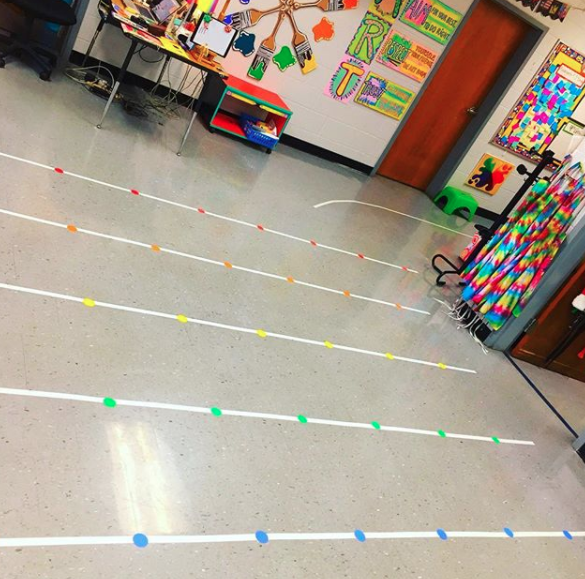
With my 30 minute art classes with my younger students (1st and 2nd grade) and my doubled up classes with my older students (which allows me to have them for an hour), getting in, seated and settled right away is really important. I've always used taped lines on the floor to create rows. However, my older kids, believe it or not, need seat spots. These are not assigned spots...just so they know to fill up all the space we can to make room for everyone. The spots are die-cut circles with clear packing tape on top. They've really helped speed up our walk-in, sit-down process.
Of course, I've gotten the rainbow-bug so all things in my art room have been rainbow-ized. Including my demo table! When I saw this cute bunting at Target, I had to get it. The rainbow peace lamp is from Walmart and the pattern pencil cups were created by me. I still use my Happy/Sad Board...it's my old standby and the kids respond well to it.
For Christmas, my mama got me this amazing chair from IKEA which I hose down with Scotch Guard twice a day. Seriously, I love it! I'm afraid it will be my messy hands that will mess it up! Let's take a look at this area before...
Check out a blog post all about the first days of school in my art room, here.
When I first began teaching at my school, close to 15 years ago (I taught for 5 years in Nashville prior to my current school-home) I used to spend my summers decorating my art room. Seriously. I'd drive in at 8am, work through lunch and leave at 3:30 when they kicked me out. Every.Day.Of.My.Summer. I would pick a cultural theme that we were to study and completely transform my art room into that environment. That was pre-blogging days but I do have a couple images from then (will share in a moment). At the time, I had this kind of freaked-out perfectionist mentality. It made it so that my room was sweet but I was burnt to a crisp when August rolled around. Over the last several summers, I've hardly gone in to my room at all...which is good, that's how it should be! But at the same time, my art room started to get neglected and feel stale. Posters had been up for ages. It had the look of an art room where the art teacher had lost interested. At least according to me. Here's how this space has now changed:
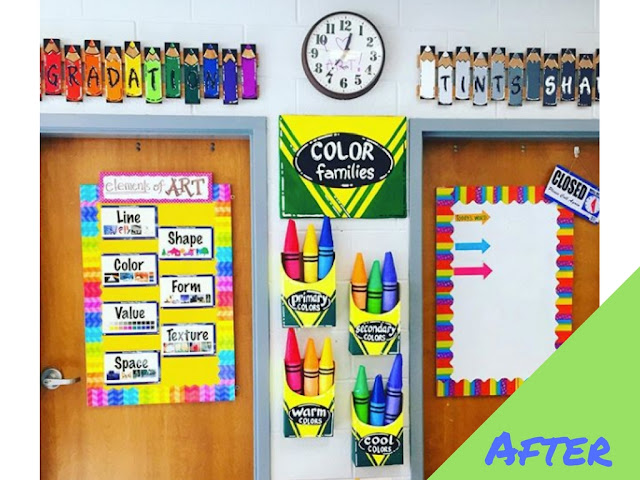
When I was given a large TV and a document camera, it was installed in an area of the room where I never used to do my instruction. So that took some adjusting. Previously, I did all my instructing in front of my giant dry erase board which is further in my art room (scroll down to see...might help you visualize the lay of the art teacherin' land). That dry erase board was super because I could draw, demo, hang examples and reference it all day long. In this new spot, I'm trying to add more demo and writing space without adding junk as is my usual MO. So, with Command Velcro Strips, I hung both this dry erase board and this painted cork board on the doors of my kiln room and my storage closet. I created the Crayon Color Family Display this summer with the help of my mother in law and the kids LOVE it. Along with my giant color wheel, it has made a huge difference in them retaining color theory information. I also had big fun painting my Tints and Shade pencils as well as my Gradation one.

Just to the left of my Gradation sign are these colorful plants! I found these laser cut wooden flowers at Target a while back and had no plans for them. Then one day on a whim, I painted them in rainbow order and hung them above my kiln room window.
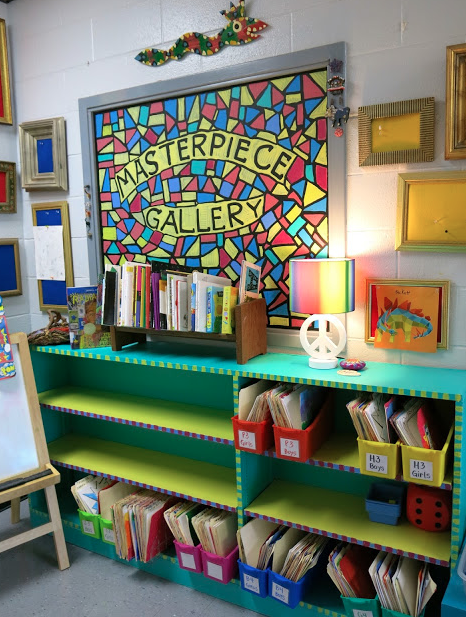
When my students enter my art room, this used to be their view. It's changed so much! Before we talk about that area behind the gong, let's chat about what I call The Masterpiece Gallery.
This is an image of what that area used to look like. By the way, the dry erase board is for our game that we sometimes play called The Smartest Artist. Back to the gallery: when I first started at my school all those years ago, this was one of the first things I did: create this gallery. You know all of those drawings the kids create at home? This is where I hang them. The window looks directly into my office (yeah, I have an office...not that it even remotely resembles anything other than a huge dumping ground but I'm working on it!). I painted it many years ago with window paint. I scored the frames from the thrift store and backed them with cardboard, cork and fabric, in that order. I love this space but it has also seen some change:
Because I really wanted to introduce my students to sketchbooks this year, I knew I had to figure out storage. I picked up a bookshelf from an abandoned classroom and gave it a painted makeover.
Since creating this space and this sketchbook system, I've already made changes! If you read the sketchbook post, you'll see how I formally had the kids pass out the sketchbooks. It was a decent system and it worked...but this past week, I came up with something even better. So, soon, those book bins will be empty. More storage for something else. I'll share the new process with y'all super soon.
Read my original post about sketchbooks with kids here.
This space in my art room, just past my instructional space, ALWAYS sees change. Remember when I said that I often change the area to match the culture we were learning about? Here is what it has looked like in the past:
One year, we "traveled" to Paris...
Another, Ancient Egypt.
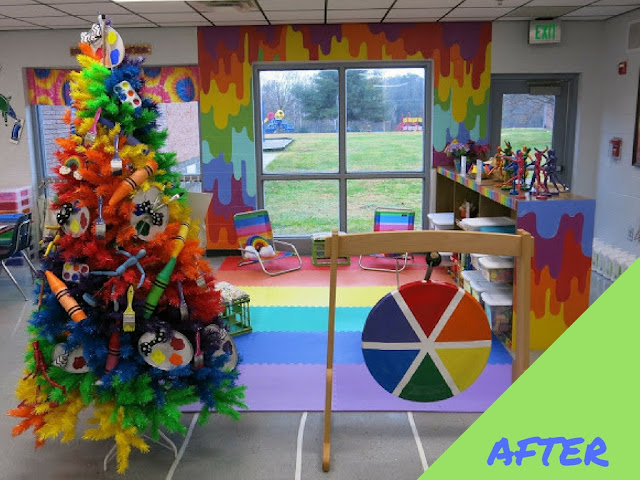
But recently, I decided that I didn't want to have one culture dominate my art room for the entire year. So now I present cultures with videos, books and artifacts. This also means I don't have to start all over every summer and redecorate this space. When I got an email fro Treetopia this year, asking me if I'd like a rainbow tree for my art room, I jumped at the chance...but knew I'd have to make the surrounding area just as awesome. So I washed the Rousseau-inspired tiger off my window, painted my wall, painted my GONG(!) and got new flooring. Here's the before, right when I got my tree up:
And after:
The kids FLIPPED.OUT. when they saw this new area. I'm so excited by all of the color. The winter afternoon sun has had a habit of blasting through that window and making it hard for the kids to see. So I have since changed the space even more...
By adding curtains! I've also hung up our "I Am" collaborative which makes me all kinds of warm and fuzzy. Folks have been asking me lately about my aprons. We hang them on Command Hooks under the window. I accidentally ordered them via a website online...I had ordered adult aprons for a workshop but these were way too small! So I brought them to the art room and we've been using them since. The kids do have to help each other when tying them but I see that as good practice.
The curtains were easy to make: I had this amazing IKEA fabric in my stash and just hemmed and hung with an extension rod.
I've been working so hard on a fun space for my early finishers this year...a space that provides more than just the usual books, dry erase boards and blocks. I'm tweaking this area every week and adding more things almost daily. The kids LOVE it! You can read more about my early finisher activities and policies here and here. By the way, I have been getting a lot of questions about my art room placemats. I made them...you can find out the details here:
I have the Fire Marshall to thank for a lot of my redecorating (insert side eye). No more hanging things from the ceiling, she said. Boo! At the start of the school year, my cute crayons and other ceiling decorations all came down. You can check out how I made that big ART sign here.
That left my space so bare! As a lot of you know, this table is my Art Supply Store. After giving lesson instructions, this is where my students "shop" for their individual supplies like paper, paint brushes, you name it. That large wooden drying rack has since been moved into my office which is right behind that door. I'm hoping to add a pegboard to hold supplies in it's place.
I created this Roy G. Biv wall display with Duct tape, paint brushes and letters. By the way, Duct tape has become my fave go-to decorating tool...I've used it so much in my art room.
It's funny, as I continue to see what works and what does not, the coat rack has stopped holding my Art Teachers in Training aprons but actual coats and jackets on days when we are painting. Here's that area currently:
That little chalkboard sign is from Hobby Lobby.
I don't have much of a before photo of my cabinets as they've pretty much just always been cabinets. This whole area of my art room, the counter space, is definitely under construction. I would love to have pegboard added either under the cupboard or at my "store" area. Regardless, the only thing I'm happy with here are my Alphabet Cabinets.
Yep, the Fire Marshall wasn't a fan of the paper chains and all the rest I had hanging from the ceiling. When I took it down, I took down a ton of other stuff too. I also had a sweet and kind friend of the school custom build me a shelving unit to go right under my dry erase board area. I had always thought was a waste that space was...and I now have all of these fabulous shelves for our supplies!
I used to color code my tables with bulletin board paper. That got to be too much to change out and keep up with...so my alternative was to place Duct tape on the edge of the tables and it has been working perfectly! If you look closely, you'll see the new shelving under my dry erase board. That board now serves as my I Can statement wall.
The baskets are from the Dollar tree. They didn't have all of the colors to allow me to color code them...so, if you look at my labels, you'll see I color coded them.
Above my dry erase board, I created this line display with...Duct tape! I also made that clock a while back with paint samples.
These trashcans are ones I brought from home. The art room ones are so small! And I'm always moving them around and unable to find them when I need them. So I decided to color code them and keep them at the end of each corresponding tables.
Now I keep the cans and the drying racks at the end of each group of two tables...and I love it. Although I STILL get the question: Where is the trashcan?
I swear, this is the year of trying new things...and one that I'm really excited about are my seat sacks. I found some at the Dollar Tree...but they didn't have a rainbow so I had to make my own!
And, yes, they've already gotten paint on them. It is an art room, after all!
One of my most favorite things in my art room has always been my Art History Wall. I had had it up FOR YEARS...and was over it. The art history wall was rarely visited or seen by my students. So I decided to take it down and replaced it with this:
This bookcase is new too...another abandoned find. I'll share more about the supplies on this shelf soon...I'm still working out the kinks on this system.
So...the REAL reason for sharing all of this with you? Honestly? BECAUSE I'M SO FRUSTRATED. Every morning when I walk in my room and I just see all the projects that I want to accomplish to make my art room as fun and exciting (and clutter free) as it can be for my young artists. I shared my anxiety recently with a coworker and she said, "Are you kidding?! Look at everything you've done so far!!" That's when I realized just how hard I had been working...and that there was progress.
At the start of the year, I knew I would want to make changes, so many changes, and I told myself: go easy, take it slow, change what doesn't work, keep what does. I can often get excited, ahead of myself and frustrated. Seeing all of the changes I've made in one VERY LONG blog post has made me happy...I am working hard. I still have so much to do but it's like eating an elephant: one bite at a time.
So, what's next? I want to create an early finishers fibers area as I have started to do in the photo above. I want to create an area where the kids can take photos of their art work and upload to Artsonia independently. I want to create binders for each table that will have idea sheets and drawing prompts. I have already purchased supply carts for each table (they have not arrived yet, will share soon) so that the kids can get their own supplies and I don't have to hustle to have everything out. And I really REALLY want to tackle that counter, my cabinets and my closets.
Do you see why I get overwhelmed?!
But I'm getting there...and I'm so happy I decided to scrap the old this year. It's really been making going to school every day and teaching in a bright, colorful and less cluttered place so much better.
Thank you for dropping by this VERY long-winded blog post! xo!


